You never know what your first “hit” will be when you are a designer. My first “hit” pattern was Rustic Refuge… I am still not sure if it was the adorable outhouses with the log cabin layout. Or if it was the toilet paper themed fabric, which arrived in shops just as the toilet paper shortage of 2020 hit!
I was tickled pink when a shop owner sent me an image of the “poop” emoji she used as a quilt motif for her quilt. I thought it was simply perfect.
Several of my patterns feature log cabins surrounding focal fabrics. This simple frames really dress up some fabulous prints, without making them overly fussy!
The traditional log cabin has uniform strips or “logs” that are added clockwise, or counterclockwise around the center block. Typically, there are two color gradients, that provide depth, like attic windows.

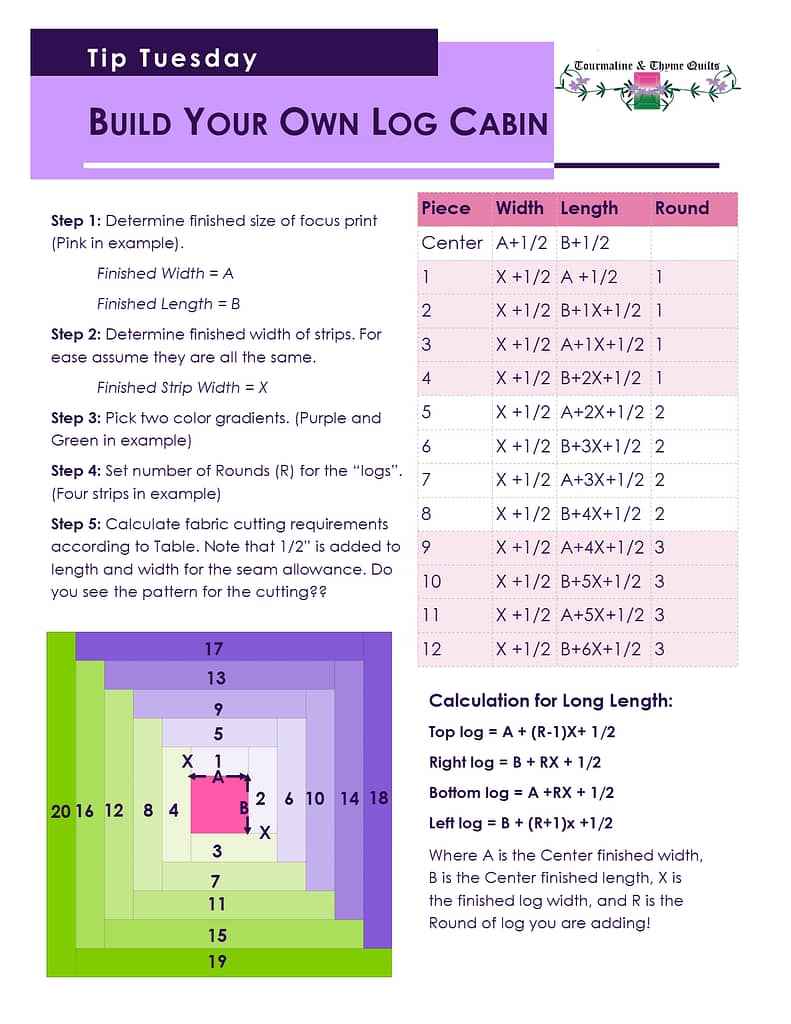
So, do you have the perfect focus fabric that you would like to use in a quilt? Then, stop searching for a pattern and design your own!
The trick to making the log cabin is to understand the formulas. Your focal fabric doesn’t need to be a square. It can be a rectangle. For example, you could frame a panel.
Then, pick fabric you love. When all else fails, choice fabrics from the same collection. Or pick colors from the focal fabric to create a nice blend. Use contrasting fabric to make a statement. Just remember, the statement shouldn’t detract from that fabulous fabric you are trying to highlight!
The steps to design a log cabin are pretty simple.
Step 1: Determine finished size of focus print (Pink in example). Remember you will need to add 1/2″ to both dimensions when cutting to account for the seam allowance.
Finished Width = A
Finished Length = B
Step 2: Determine finished width of strips. For ease, assume they are all the same. Again, you will need to add 1/2″ to both dimensions when cutting to account for the seam allowance. Lots of thing logs, call them twigs if you will, can look really cool. Think of some of Guicy Guice’s patterns. Or you can use really wide ones to make a large block quilt. Maybe add some applique or embroidery on the logs?
Finished Strip Width = X
Step 3: Pick two color gradients or color families. (Purple and Green in example) This is where you can have a little fun. You can go from light to dark, or dark to light. Or you can transition from one color to another.
Step 4: Set number of Rounds (R) for the “logs”. (Four strips in example) You can use any number of rounds you want for a log cabin. The more rounds, the bigger the block. Make sure not to lose the pretty print you are using in a pile of logs.
Step 5: Calculate fabric cutting requirements according to formulas.
Calculation for Long Length:
Where A is the Center finished width, B is the Center finished length, X is the finished log width, and R is the Round of log you are adding!
Top log = A + (R-1)X+ 1/2
Right log = B + RX + 1/2
Bottom log = A +RX + 1/2
Left log = B + (R+1)x +1/2
You can download this handy guide for the formulas.
I would love to see what types of Log Cabins you design. Please share them with me either via email or Facebook.
Happy Quilting!

