Most quilters have an element of quilting they don’t enjoy as much as others. For me, it is binding a quilt. It is a necessary evil in my mind. I have tried various methods to minimize the torture of this last step. That being said, if it has to be done by hand (like for a show), I will use it as a great excuse to sit and watch a movie or two that I have been itching to see. That aside, if I can get them done more quickly to get to the parts of quilting I enjoy, I will try it.
Aside from the fact that it can take me over 4 hours to hand bind a queen-sized quilt, there are other aspect that cause me pain – quite literally! Binding a quilt generally requires making bias strips. Technically, bias strips are just that strips cut on a bias. This means that you need to calculate the amount of fabric needed, cut it at a diagonal, sew the strips togethers, and iron them into a bias tape before you can even use them! Bias binding is a necessity if you have curved edges because it needs to stretch around the curves. But I primarily make straight edged quilts, so I have “cheated” and used strips cut along the grain of the fabric – I cut straight strips from the width of fabric (WOF). Binding tape (rather than bias tape) has decreased some of the time and effort.

As for making the binding tape, it still needs to be pressed twice to get the proper shape. First, you fold it in half, wrong sides together, and press it. Then, you open it up and fold each edge to the fold you just made and press it again. This essentially makes a four layer tape in which you insert the quilt edge in the middle of it. This method hides all of the cut edges and minimizes fraying. All very useful things. I don’t know about you, but I have burnt my fingers every time I do the pressing…. I even invested in different tools to fold the fabric as I ironed it to keep my fingers farther from the heat. I must be uncoordinated or accident prone, because I still have issues. Not to mention, it takes an hour just to double fold and press over 8 yards of tape for a queen-sized quilt (this is the most popular size I make).
Even after all that pressing, you sew one side of the tape on. Then, you turn it over to sew the other side on and hope you catch the tape efficiently. I have even used my walking foot and tried to sandwich the tape around the edge and stitch both sides at once. It worked better than other methods, but still was a bit tricky to ensure the tape was sewn down on both sides.

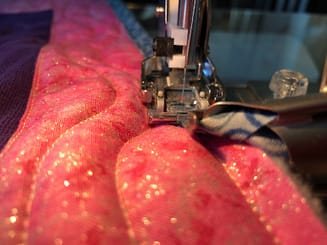
There has to be an easier way! Just as I was getting to the point of utter frustration, the answer came to me in one of my Facebook groups. Someone posted a poll asking who binds their quilts by hand versus by machine. Hmmm… this is a real thing. So I started investigating “binding tools” or “binding feet” for my Viking sewing machine. Lo and behold, Viking recently marketed a quilt binding foot! It was not inexpensive, but it certainly paid for itself within three quilts. The foot is a variation of a bias binding foot and uses your walking foot. The tool folds the fabric for you and wraps it around your quilt edge just before you sew it on. I wasn’t so far off with my last attempt!
Now, it does take a little practice. I watched several YouTube videos to get an idea on how to use it. Starting and stopping were pretty straight forward – corners on the other hand were a bit of a sticking point. Pun intended. One person recommended pins – which are difficult to remove before you sew over them. Another suggested gluing the corners, which I found messy. I resorted to a bit of a backward method. When you finish a side and are ready to turn the corner, you pull the edge out from under the needle, make sure your have your beautiful miter joint folded around the corner, and then slide it back under the needle about an inch from the corner. Then, you backstitch to the corner. This makes sure you catch all of the binding. One of these days, I will take a video and post it as a demo. Trust me, it works like a charm.
Of all the gadgets I have purchased over the years for quilting, it is definitely in my top 10 couldn’t do without items. How do you bind your quilts?
Happy Quilting
Laureen