
The Nine Patch is a basic block that most quilters learn. It is the building block for lots of other blocks. It is pretty simple, which makes it a wonderful block to sharpen some of your skills. A few simple tips to try on your next Nine Patch may perfect your piecing.
Measure
The most common way to make a Nine Patch is with strip piecing. To make your own Nine Patch, determine what finished size you want – say 6″ square. Divide that size by 3 and add 1/2″ to determine the width of the strips. In this case, the strips should be 2 1/2″.
Starch
Start with starched strips. They don’t need to be starched to the point of being boards. But a little starch will keep them from stretching and warping. The starch will also make pressing the strips easier later.
Sew Initial Seam
Usually, edges of the fabric will be aligned before sewing the seam. In this instance, make sure the lighter fabric is a little longer than the darker fabric. (see photo)
This will minimize shadows which can occur when darker seam allowances are pressed toward lighter fabric.
The 1/4″ seam allowance should be measured from the lighter fabric. This will make a scant 1/4″ seam allowance.

Adjust Seam
Sew the strips together, being careful to maintain the 1/4″ seam allowance. This will make the Strip Set. BEFORE cutting into pieces, measure the middle strip. Is it the correct width? Measure in several places. In this case, it should be 2″ wide. If it isn’t do NOT rip the seam out yet.
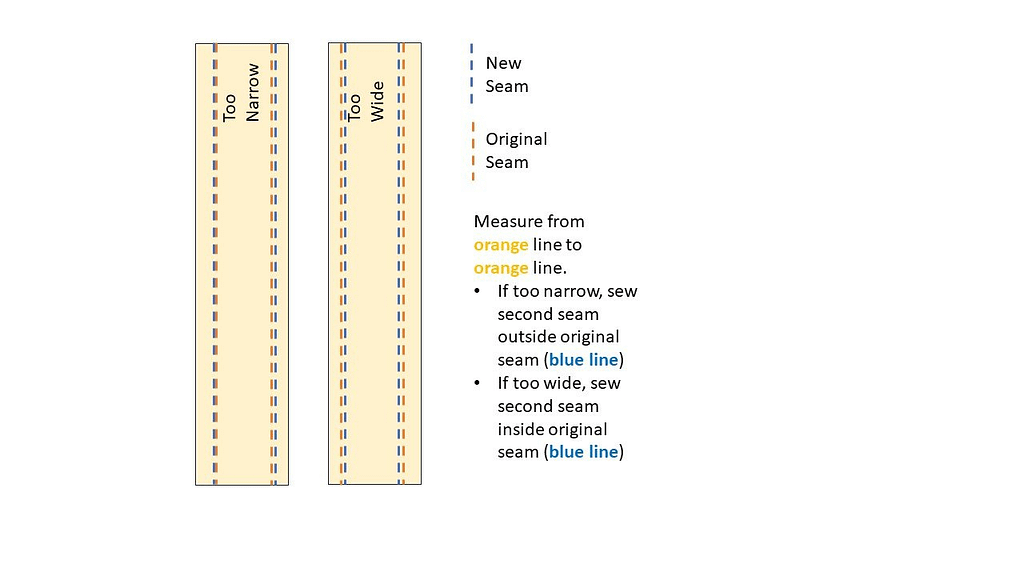
- If the middle strip is too narrow, say by 1/8″, sew another seam outside the existing seam (approximately 1/16″). Then, rip the first seam out. Why wait? This minimizes the chances that you make the same mistake again. It provides a guideline of where you should be stitching.
- If the middle strip is too wide, say by 1/8″, sew another seam inside the existing seam (approximately 1/16″). You don’t need to rip the first seam out. If you want to, wait until after you sew the second seam.
- Measure again for perfection!
- No need to trim Strip Set yet.
Cut and Press Units
Cut the Strip Set into Units. The Units are the same width as the original strips – 2 1/2″. In this case, the Units will be 6 1/2″ x 2 1/2″.
Do NOT press seam open. Press the seam allowance of the Outer Units away from the middle. Then, press the seam allowance of the Inner Units toward the middle. Pressing seam allowances together creates a slight ridge, which makes nesting seams easier. For the seams to nest, the seam allowances for the Outer Units should be pressed out, while the Inner Units should be pressed in.
Do not worry about the colors. If you made the lighter seam allowance a little longer. The dark fabric should not create a shadow.

Sew Units
Sew Units together, nesting the seams. If you want you can pin, clip or glue them there. Nesting the seams means sliding the seams of two Units so they lock together. If the seams nest properly, the corners will match perfectly.
Spin Seams

Flip the piece over. Take the last seam sewn at the intersection of the two seam and twist it gently. The stitching within the seam allowance will loosen. Then, press seam allowance so each points in a different direction. This is called spinning the seam.
Again, no need to worry about shadows as the slightly longer light fabric will prevent the dark shadow.
Spinning the seams prevents bulk. The seams, especially wear they intersect, will lay flatter.
Trim Block
Once you have carefully completed the previous steps. Trim the block. It shouldn’t need much. When trimming try to use a square ruler the same size as the block. It makes trimming so much easier. Center the ruler in the middle of the center rows of the Nine Patch. Then, trim from each side. Rotate the ruler and block so trim the other two sides in the same way. This will keep your block symmetrical.
We hope these little tips will help you prefect your piecing!
Happy quilting!
Laureen
