

So many patterns contain Half Square Triangles (HST), that we have created dozens of ways to make them quickly and avoid minimize the bias stretch. The most common was is to make them two at a time. Cut two square 1-inch larger than the finished size. Draw a diagonal line on the back of one square. Put the squares right sides together. Sew 1/4-inch seam on each side of the drawn line. Cut on the drawn line. Press the squares open. Match the seam to the 45-degree line on your ruler and trim to size. Easy peasy. You should be able to use the same process to make Half Rectangle Triangles (HRT) right? Apparently, not. The image on the right shows exactly what happens when using the same method. The result is a kit shape, not what we were wanted. Why did this happen? Simple, squares are symmetrical and rectangles are not. There must be a similar technique out there. Otherwise, you are stuck sewing on the bias and fighting stretching, even with starch, al the time! Well there is. It is similar to the HST, but with a twist. Quite literally. But let’s start at the beginning.
First, cut your fabric pieces. For an HST, it is easy. HRTs are similar, but not the same. HST = Finished Width + 1″ and Finished Length + 1″
HRT = Finished Width + 1 1/2″ and Finished Length + 2″
Second, determine which direction the triangles face. They are not symmetrical so you will have a right facing triangle or a left facing triangle. They are not interchangeable. Draw a diagonal line on the back of the rectangle in the opposite direction needed for the final triangle. Try it with a piece of paper, you will see that when you flip it over to the right side, the line is in the correct direction. Trust me on this one. Don’t be tempted to put the rectangle together matching edges. This is where the twist comes in. You will match opposite corners of the rectangles. This is also where a picture is worth a thousand words. The picture to the left shows how to place opposite corners together. They will make the exact same triangles. This just shows how it looks depending upon which rectangle you put on top.
After you place the rectangles together, sew a 1/4″ seam on each side of the line. Cut on the drawn line. Press the rectangle open. The HRT will be larger than needed, just like the HST. This is where the similarities end. It needs to be trimmed, but you cannot use the 45-degree line on your ruler. Also, you don’t want the seam directly in the corners. Why? If the seams are directly in the corners and you subtract 1/4″ from both edges, the seam will no longer be in the corner. Try this with a piece of paper, or scraps of fabric. Put opaque tape 1/4″ from the edges, where is your diagonal? Not in the corners. Why? The seam is not a 45-degree line. It is some other angle depending upon the width and length of your finished square.
There are several methods for trimming that will yield a proper diagonal. The method, which I find easiest, it to put tape on a quilting ruler to mark the final cut size. Using the markings on the ruler, align 1/4″ marks on the diagonal and then trim. This is easiest to show with another picture. In this case, I wanted a 2 1/2″ x 3 1/2″ HRT. Therefore, I used a 3 1/2″ square ruler to make my life a little easier. Then, I put tape on the 2 1/2-inch line to mark the width of the piece. The first corner is easy, I used the 1/4″ lines on the ruler and put it on the seam. For the second corner, I could use one 1/4″ line. For the second 1/4″ line I used the 2 1/4″ mark (1/4″ from my tape). From here, I trimmed three sides, top, right and bottom. Then, I turned the ruler around to trim the final side. 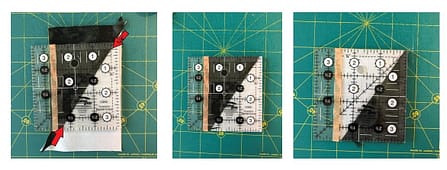
I tend to make things in pairs. So, I made the mirror image HRTs as well. Here are the finished HRTs. As you may be able to see, the diagonals are offset on the short by about 1/8″.  HRTs two at a time, take a little practice, but are worth it!
Happy Quilting
Laureen

 Don’t be tempted to put the rectangle together matching edges. This is where the twist comes in. You will match opposite corners of the rectangles. This is also where a picture is worth a thousand words. The picture to the left shows how to place opposite corners together. They will make the exact same triangles. This just shows how it looks depending upon which rectangle you put on top.
 HRTs two at a time, take a little practice, but are worth it!