Have you ever used paper foundations or templates for a project? Have you sewn a block together and found it to be smaller than the designer says it should be? Did you measure your 1/4-inch seam accurate and still have an issue?
You are not alone. This often happens with copies or printed patterns. It is not the designer’s fault. It is not your fault. It is the printers fault. You heard me – go ahead a yell at the electronic printer/copier you rely upon to make your life easier. Your read it right – the printer did it. Actually, in this case, the printer didn’t do it RIGHT!
So let’s start at the beginning. When you print a PDF file or copy a document, the printer assumes (per the settings) that you want to see everything on the page. Because the printer has margins, like our seam allowances, where is can’t print (most don’t go edge to edge), it has to shrink the document to fit into the print area. Thank you Leo sharing that knowledge. This is one of the reasons designers add a box that says “THIS IS 1-INCH SQUARE.” They are giving you a gauge for your printer.
How do you fix this for your pattern? There are two ways : 1) do nothing to the printer and adjust your sewing or 2) adjust the printer settings.
Let’s tackle the first option since you probably have recognize the problem after you have sewn a block together. This usually happens when you have limited fabric, so recutting is not an option. And it is late at night and you can’t go to the store…. I know how this works. I have been there! First, don’t panic. The good new is that all of the pieces are shrunk proportionally. This means that sections of your foundation or paper piecing will still fit together just as designed. The block will just be smaller when finished. If you are ok with this – great! Otherwise, use a quilters hack – add a small strip of coordinating fabric to make it the right size.
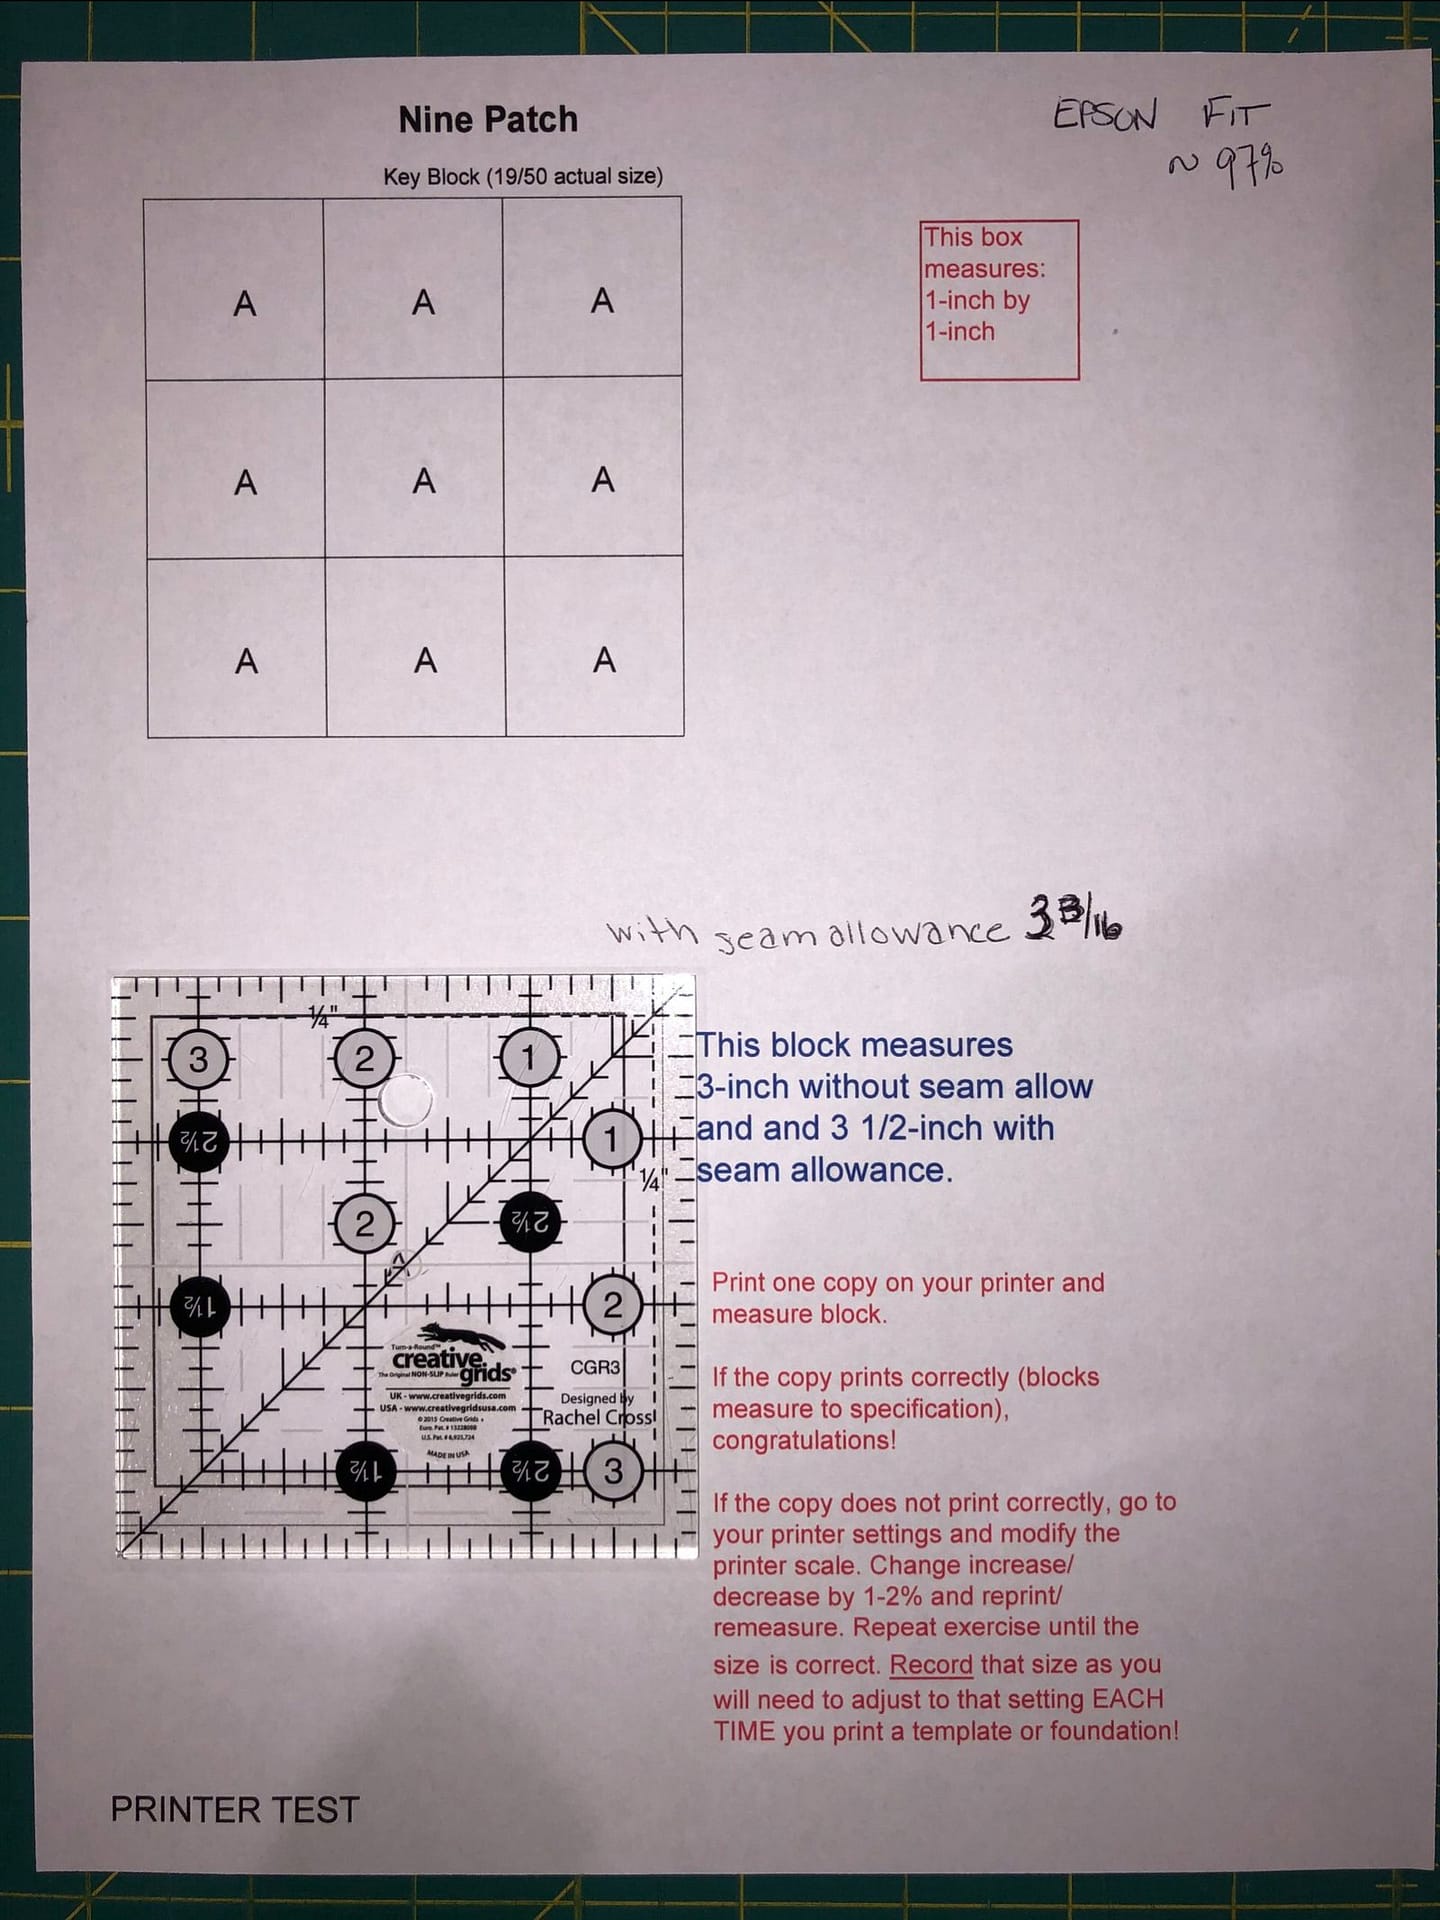
Now, if you are lucky you have caught this before you start cutting. So you can fix it using the Goldilocks method. I have more good news, if you learn how to fix it once, you can fix it every time the same way for the same printer. Designers, including me, add the 1-inch block, but that can be deceiving. You may not see the minute difference is size with a 1-inch block. It is like the fraction of an inch we worry about when trying to get that perfect 1/4-inch seam. So I want to thank my friends at Electric Quilt, for pointing me in the right direction. Let’s use a bigger test block! This will show the difference more readily.
Ready? Download and print this Nine Test block (PDF file).
Now, what happens? I will show you what happened in my studio, where I have two printers: EPSON and HP. When I printed the EPSON file without touching the settings, it printed at less than actual. The block with the seam allowance should have been 3 1/2-inches. But my ruler showed only 3 5/16-inch. Talk about frustrating!
This is when you need to look at your printer settings. I can guide you through the Windows version of this (sorry Mac users). When you have the PDF open, click HOME. Then, click PRINT. This should open your printer settings where you select which printer, how many copies, double sided, etc. Look for a section that says something like “Page Sizing and Handling.” Here is where my printer was originally set to “FIT.” That meant it shrunk the image to fit the print area.
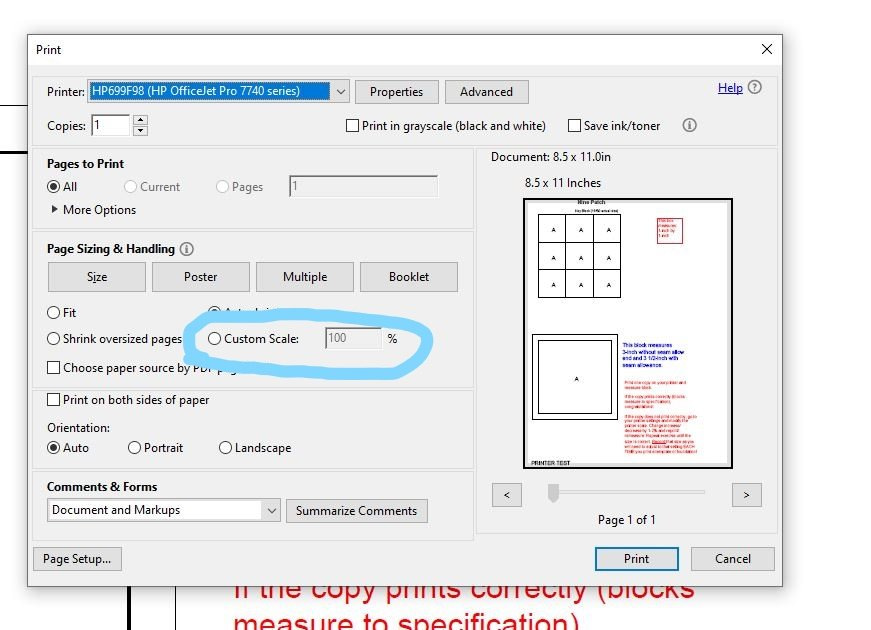
Now, comes the Goldilocks method, tweak it until it works. For my EPSON printer, I first I tried ACTUAL, which was supposedly 100%. The square was 3 3/8 – closer but not it. Then, I tried 102%. It was close, but not quite. So I tried 104%. That was just a smidgeon too big. So for the EPSON to print ACTUAL size, I need to select 103% each time I print templates.


Then, I tried my HP printer (technically it is my husband’s printer, but I use it more). It was also set to fit at 97% (3 3/8-inch). When I selected “ACTUAL,” the custom size read 100% rather than 97%. Low and behold, it really was 100%. So you can probably guess which printer I use for my templates. Yup – the HP.


Note for each of the printer tests, each time I increased the percentage, less of the image printed. For example, “PRINTER TEST” at the bottom was cut if half or totally disappeared. So you need to be VERY careful when you print images that extend from one page to the other. Generally, designers provide registration marks (the lines about 1/4-inch from the edge) so that you can align the images. You want to make sure that these registration lines don’t disappear. If they do, you may not have the right sized piece later.
I am curious to hear how your printers perform in this test. Please leave a comment and let me know!
Happy Quilting!
Laureen