There are numerous instructions on the internet for making flying geese, but not many about using them in a quilt. This came to mind over the weekend as I was making flying geese blocks, sewing them together and cursing as the strip of geese didn’t turn out as I wanted. So I decided to provide some tips for using Flying Geese as well as making them. That is what I get for sewing tired and being in a hurry.
First, let’s use a common language. The block consists of one large triangle (goose) and two small triangles (sky). The ratio of the width to the height for a finished block is traditionally 2:1. The top of the piece is where the top point of the triangle is.
Making Flying Geese
There are four standard methods for making flying geese. The geese shown here will be 2” x 1” when finished.
- Traditional Method – Make a two sky triangles by cutting a square in half on the diagonal. The square should be 1/2” larger than the finished height (1 1/2” in our example). The triangle for the goose should also be 1/2” larger than the finished width and height (1 1/2” x 2 1/2”). Sew the hypotenuse of the sky triangle to the sides of the goose triangle.
- Stitch and Flip Method – Take two squares, which are 1/2” larger than the finished height (1 1/2”) and draw (on the wrong side) one diagonal line from corner to corner on each. Place the square on a rectangle that is 1/2” larger than finished height and width (1 1/2” x 2 1/2”). Align two corners of the rectangle with two corners of the square. Sew on the diagonal line. Then, trim 1/4” from the diagonal line (corner side) and press open. Do the same on the other side.
- No Waste Flying Geese – This method makes four Flying Geese at a time, so is great for multiples. Not so great for singles… Cut a square 1 1/4” larger than the finished width of the block (5 1/4”). Cut four squares 1” larger than the finished height (2”). Draw one diagonal line from corner to corner on the wrong side of each small square. Place two small squares (right sides facing) on opposite corners of the large square. Align corners and make sure the drawn lines match to make one line across the block. Sew 1/4” on each side of the line. Cut the pieces apart on the line. Press the two pieces open. They will look a bit like hearts. Place one square on the heart shaped piece aligning the square corner with the bottom of the heart. Again, sew 1/4” of each side of line. Then, cut on the line to make two Flying Geese. Repeat for the other two Flying Geese.
- Foundation Method – Using foundation paper, tape or fabric, sew the Flying Geese together.
Using the Flying Geese
Flying Geese are typically sewn together to make sashing or borders. they may also be combined with other simple pieces to make more complex blocks like nine patch stars. Nine patch stars consist of four Flying Geese and five plain squares.
The beauty of Flying Geese are the sharp points they provide in these blocks. Keeping these points sharp, while maintaining the block size is the trick. If you provide a little extra room on top to keep that point sharp, the bottom two points will get cut off in the side seam. To keep all three sharp, if you are generous on the top point, you will have less than 1/4” seam on the sides. Those 1/16” or 1/8” changes may not seem like much, but when you are stacking several geese together as I was, it can add up to 1/4” difference or more!
So how do you keep points without increasing the size? First, make sure you square up your pieces. Ensure there is 1/4” on top. If you need to trim a little, do it from the bottom of the piece. Trimming from the bottom will keep your points sharp. Also, trim evenly from the sides to ensure the top point is centered.
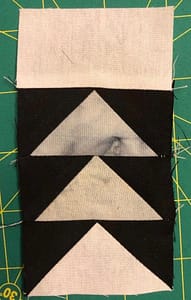
Next, draw a line on the wrong side of the block, 1/4” from the top edge. It should run right through the point of your top triangle. This is your sewing line. Go slow and follow it carefully, especially as you reach the point. Because of the material bulk at the point, the presser foot may balk. (See photo for example)
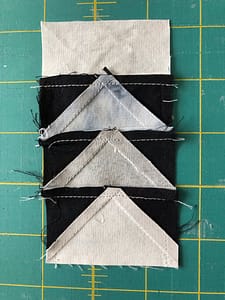
Sew with the points on top. For example, when sewing the white rectangle and the top Flying Geese block together, the white piece was against the dog teeth and the Flying Geese was on top against the presser foot. This way, I could see where the points were. The same held true for the next geese blocks, I made sure the point I was sewing through was on top.
Pressing the seams for Flying Geese is tough. If you want to see the side point, you need to press the top point down toward the block. Unfortunately, this adds ugly bulk to the top. So, I recommend, pressing the top point up. Then, draw a seam line on the sides. You can check the side points to ensure they are not caught in the seam before you sew. I also verify as I go by stitching slowly and peaking at the point.
I know this seems like a lot of extra work. Take it from me, it is less work than ripping out seams and resewing…sometimes more than once! I hope this helps you improve your flock of Flying Geese
Happy Quilting 🙂
Laureen

Great compilation of hints! Thanks.
Thank you!