Ever buy a quilt kit and then decide you don’t like the pattern by the time you get around to making it? That was the case with this quilt. My son and I picked out the kit several years ago. A few months ago, I found the kit in the closet and asked him if he still liked it…. Nope. So what to do?
I had always wanted to try a Disappearing Four Patch pattern. This kit had fifteen fat quarters each of light and dark fabrics plus enough dark fabric for borders, binding and backing. That was perfect – I could tackle a little of my stash (justifying another shopping excursion) and try something new without added expense!
This was one of the rare occasions where I pre-washed the fabrics as red ones tend to bleed. I ironed everything out again and cut it up into as many charm squares (5 inch by 5 inch) as I could. Then, the fun began. The quilt is actually quite simple once you understand the concept (Both Missouri Star Quilt Company and Jordan Fabrics have YouTube videos to show this process). The steps are listed below.
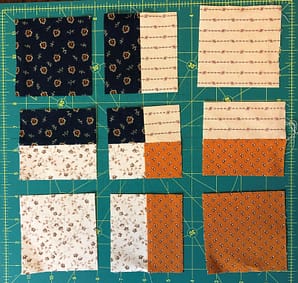

- Assemble four patches with two assembled of two dark and two light charms. The darks and lights should be catty-corner from each other.
- Press the four patch block
- Cut 1.5 inches from each side of the side of the centerlines (vertical and horizontal). If you would like narrower centers, you can decrease the distance from the centerline to 1 inch. You can pick any width you like, as long as you are consistent in a block. This will result in nine pieces.
- Rotate the five middle pieces (right, left, top, bottom, and center) 180 degrees. The four corner pieces stay put. See photos below.
- Sew the resulting nine patch back together again as the “disappearing block”. I highly recommend that only one block is cut, rearranged and resewn at a time to avoid confusion.
- Press the “disappearing blocks”.
- Assemble the blocks.
- Add the border.
- Quilt and bind.
- Both Missouri Star Quilt Company and Jordan Fabrics have YouTube videos to show this process.
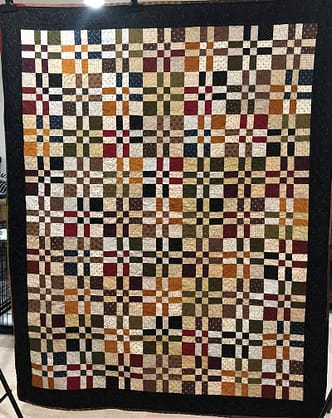
I decided to donate this quilt, through my guild (Haymarket Quilters Unlimited), to the Wounded Warrior Project. The project sponsors retreat homes for recovering soldiers. The homes are always in need of more quilts.
It felt great to recycle a quilt kit into a much needed donation for such a good cause. So if you have under appreciated quilts, try something new and donate the result to a worthy cause.
Happy Quilting
Laureen